What it solves and why you would use it
Documentation batches need consistent names, templates, scales, parameters and destinations. The current EZ View & Sheet Manager interface combines parameter-based packages with bulk creators and editable management tables, so the workflow continues after initial sheet creation.
Before you start
Install the plug-in for your version of Revit and open a sample model.
Six foundations carrying Pour Sequence values P01 and P02; one title block and appropriate plan/section templates.
Open the tool: EZ-VDC > View & Sheet Manager.
Worked workflows
Example: foundations grouped by a project parameter
- Parameter Creation: check foundation categories, choose the grouping parameter and scan. Select one representative group.
- Choose Foundation, plan/section types, templates, scales and crop/annotation margins.
- Set naming tokens and sheet numbering, choose a title block and overflow policy. Build preview.
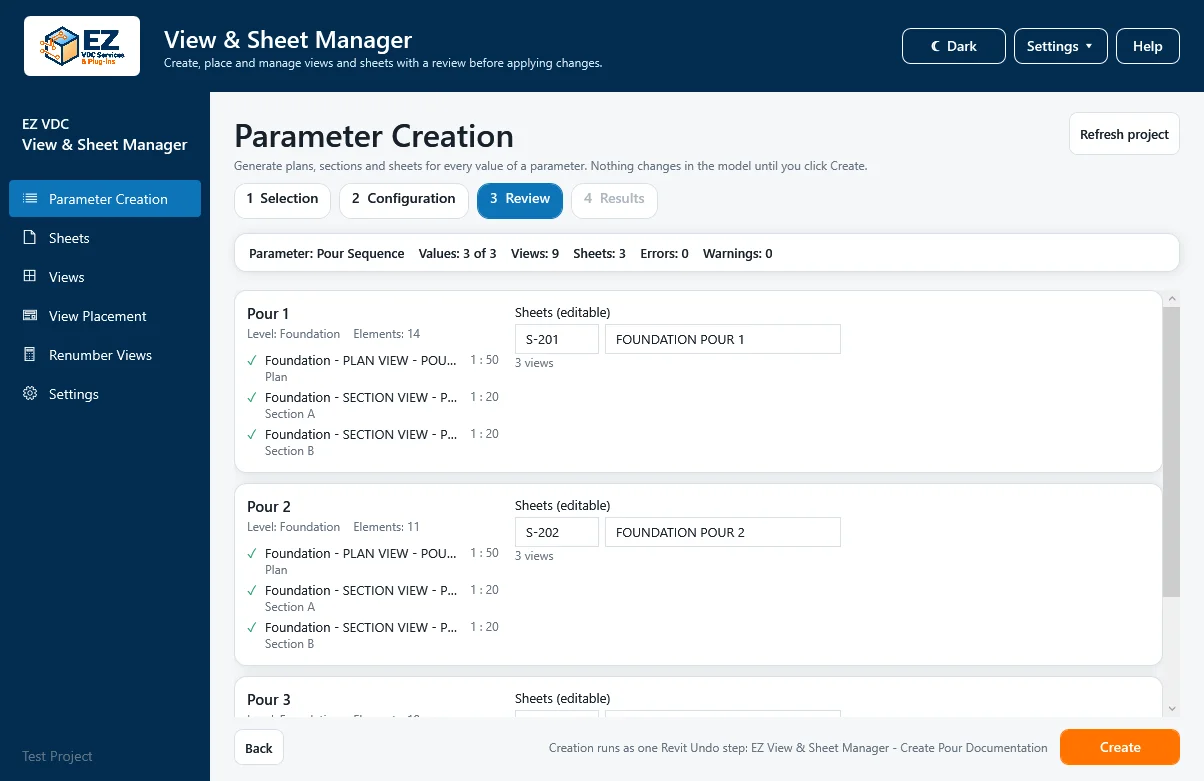
- Inspect all proposed views and sheets, correct names and Create. Compare the result with the model, then save defaults for the next batch.
Expected result: A reviewed plan-and-section package tied to the actual selected element group.
Example: a sheet register from Excel
- Sheets → Create: choose the default title block and required project-parameter columns. Export the Excel template.
- Fill unique sheet numbers/names and loaded title-block choices. Import and verify every column mapping.
- Check valid rows and Create. Review Done/Failed statuses.
- Manage existing sheets: filter the created register, stage metadata changes and Apply changes.
Expected result: A created register plus a controlled maintenance workflow.
Every button and parameter
Open a window or tab below to find its controls. Interface names match the plug-in; you can also search by function or unit.
55 of 55 reference entries
Parameter Creation · Selection
6 entries
This workflow creates views around element groups sharing a parameter value. It is different from the independent bulk-row view creator.
- Refresh project / Selection / Configuration / Review / Results
- Refresh reloads project choices after model edits. Step buttons navigate the four workflow pages; later steps depend on valid earlier choices. Refresh before scanning newly added categories or parameters.
- Category filter / Show selected only / Category checkboxes
- Filter category names, check the categories whose elements should be grouped and optionally show only checked categories. The checkboxes determine scan scope; the text filter only changes display.
- Parameter filter / Parameter / Scan project
- Find and choose the grouping parameter, then Scan project. Results report values with element and level context. Verify the chosen field’s meaning before treating a value as a documentation group.
- Value filter / Value checkboxes
- Filter the scanned values and check groups to create. Values and their elements determine the view crop. Inspect unusual counts or groups spanning several levels.
- All / None / Select filtered / Clear filtered
- All/None affect the entire value selection. Select filtered and Clear filtered affect currently filtered values, allowing incremental selection without losing other checked groups.
- Select in Revit / Next: configure
- Select in Revit highlights the group’s actual elements for scope inspection. Next moves selected groups into configuration; neither creates views.
Parameter Creation · View configuration
7 entries
Choose the package type, then its view types, templates, scales and model-space crop margins.
- Preset / Generic view arrangement
- Foundation creates one plan and two perpendicular sections. Wall creates a plan plus longitudinal/transverse sections. Generic offers plan only, plan + one/two sections or sections only. Choose based on the group geometry and the documentation needed.
- Plan / Section view type
- Choose compatible loaded Revit view-family types. These determine the native view type; a naming abbreviation does not change the geometry or family type.
- Plan / Section template and scale
- Select templates and scales separately for plan and section views. Template-controlled scale/crop settings take priority and are reported. Larger scale denominators produce smaller sheet footprints.
- Crop padding
- Model-space length surrounding the grouped element bounds, using the displayed model-unit hint. Increase for context; excessive padding increases the sheet footprint. Enter a valid non-negative length and preview again.
- Annotation crop / Annotation offset
- Annotation crop clips tags/dimensions as well as model geometry. Offset uses paper-space units displayed by the interface and sets extra annotation allowance. Check tag visibility and template locks in review.
- Plan / Section name patterns and token buttons
- Tokens: {ParameterName}, {ParameterValue}, {Level}, {ViewType}, {Sequence}, {Discipline}, {SubDiscipline}, {SectionLabel}, {SheetIndex}, {SheetCount}. Add :upper or :lower to a token for case conversion. Token buttons append to the focused pattern. Unknown tokens are flagged; inspect the resolved names.
- Plan abbreviation / Section abbreviation / Sub-discipline
- Abbreviations supply the {ViewType} naming value for each view class. Sub-discipline supplies its naming/parameter value when applicable. Keep these consistent with browser organization and project naming conventions.
Parameter Creation · Sheets, duplicates and review
10 entries
Build preview resolves names and placement before a model-changing operation.
- Create sheets and place views / Title block
- Enable to create sheets and place the package; otherwise create views only. Choose a loaded title block with a suitable outline. Layout uses its outline minus configured margins.
- Sheet number prefix / Start / Suffix
- Numbers combine these fields, for example prefix A, start 201, suffix blank → A201. Use the preview to confirm uniqueness and continuation numbering. Start is the numeric sequence portion.
- Sheet name pattern
- Uses the naming tokens to describe each group/package. Include parameter value or level where needed; inspect names together with their proposed sheet numbers.
- Overflow handling
- Add another sheet keeps scale and continues placement. Try the next smaller scale first can reduce a view before adding sheets. Template-controlled scale may prevent shrinking; review warnings and the actual preview.
- Multi-sheet numbering / Continuation name suffix
- Choose sequential numbers, such as S201/S202, or letter suffixes, such as S201A/S201B. The name suffix can use {SheetIndex}/{SheetCount} to make continuations understandable.
- Duplicate view / Duplicate sheet handling
- Views can auto-rename, skip or replace an existing view; Replace deletes the existing item. Sheets can increment numbers or skip according to the chosen policy. Review resolved names and edit the preview before applying replacements.
- Back / Next: preview / Save as my defaults
- Back returns to selection. Next builds the proposed package and validates configuration without creating it. Save as my defaults retains your naming/view choices for future batches.
- Review · Sheet number / Sheet name
- Editable proposed sheet identity fields. Correct project conventions or duplicates here, then review warnings, view list, scales and sheet-fit results before Create.
- Review · Back / Create
- Back revises configuration. Create commits the reviewed package as a batch with one Revit Undo step. Inspect results for failed or template-limited items. Nothing was created merely by scanning or previewing.
- Results · Copy report / Open log folder / Start a new batch
- Copy transfers the result text to the clipboard. Open log exposes detailed diagnostics. Start a new batch resets the workflow for another selection; it does not delete the completed views or sheets.
Bulk sheet and view creators
8 entries
Rows can be typed, duplicated, pasted or imported. Only checked, valid, not-already-created rows are eligible.
- Default title block
- Supplies a loaded title block for new sheet rows. Each row can choose its own Title Block; changing the default is not a command to replace title blocks on existing sheets.
- Sheet row · Sheet Number / Sheet Name / Title Block / Parameters
- Number must be unique, Name describes the sheet and Title Block chooses the loaded family/type. Optional project-parameter columns write non-empty values on creation. Read-only parameters are unavailable for writes; show the parameters you actually need before importing.
- View row · View Name / View Type / Level / Template / Scale / Linked Sheet
- Name must be unique. Supported bulk kinds are Floor Plan, Ceiling Plan, Structural Plan, Drafting and 3D; plans need a level. Choose a compatible template and scale. Linked Sheet is an optional placement destination. Sections/elevations needing a location belong in the parameter-based workflow.
- Missing linked sheet policy / Title block for new sheets
- Choose how to handle a Linked Sheet number that does not exist. If the chosen policy creates the sheet, select its title block. Existing sheet viewports are not rearranged by this creator; inspect overlap warnings.
- Add row / Duplicate
- Add inserts a blank input row. Duplicate copies selected rows for editing; change unique names/numbers before creation. A copied row is a proposal, not a cloned Revit view.
- Delete rows
- Removes selected input rows from the creator grid. It is not a command to delete already-created model sheets/views. Use row status to distinguish proposed and Done rows.
- Rows ▾ · Check all / Uncheck all / Remove created rows
- Check/uncheck controls batch inclusion. Remove created rows cleans Done rows from the grid, leaving their Revit elements intact. This keeps the next batch easier to review.
- Create N sheets/views
- Validates rows and confirms how many will be created; checked error rows are skipped with a warning. Successful rows become Done and unchecked; failed rows retain error status for correction. The batch uses one Undo.
Excel import and reusable tables
5 entries
Choose visible columns before generating an Excel template; the template includes the current project’s useful dropdown choices.
- Excel template…
- Saves and opens an XLSX with visible writable columns and reference lists. Fill it using project choices, then import or copy/paste. Generate a new template when another project has different types/levels.
- Paste from Excel / Ctrl+V
- Pastes cells from the clipboard. A header row maps columns by name even when their order differs; creators can add rows. Inspect mapping and validation before Create.
- Import Excel / CSV · First row is header / Column mapping
- Choose XLSX/CSV, indicate whether its first row is a header and map each file column to the target grid column. Check a sample row and unmapped columns rather than relying only on automatic guesses.
- Import N rows / Cancel
- Import inserts the mapped rows for validation; it does not create model elements. Cancel closes the import preview. Correct errors in the resulting table before Create.
- Copy / Ctrl+D Fill down / Delete Clear values / Ctrl+A Select all
- Copy puts selected cells on the clipboard. Ctrl+D fills a selected column downward from its first selected value. Delete clears selected editable cells. Ctrl+A selects the grid cells; review selection before a broad paste/fill.
Manage existing views and sheets
7 entries
Pending changes appear blue/bold; errors red with explanations; locked/template-controlled cells are grey/italic with a tooltip. Apply is required to write changes.
- Table filter
- Supports free text and structured conditions such as View Type = Floor Plan; Level = Level 01. Operators include equals, not equals, contains and starts with. Filtering does not edit rows.
- Columns ▾ / Search / Column checkboxes
- Choose fixed or discovered project-parameter columns. Search narrows the chooser; checkboxes control visible columns. Choices are remembered per table. Some parameters are read-only or controlled by a template.
- Bulk column / Value / Apply to selected rows
- Select the destination column and value, then stage it for the selected rows. This is table editing; use the page’s Apply changes to write model values. Review locked and invalid cells.
- Include view templates
- Adds view templates to the view-management table. Template rows still obey native restrictions; a view template cannot itself have a view template assigned.
- Managed sheets · Number / Name / Title Block / Views
- Number and Name are editable; Title Block changes the loaded type of existing title-block instances. Views is a read-only placed-view count. A sheet without a title block cannot have one changed through this cell.
- Managed views · Name / Type / Level / Scale / Template / Discipline / Phase / Phase Filter / Sheet
- Name, compatible Template, unlocked Scale, Discipline, Phase and Phase Filter can be edited. Type, associated Level and placed Sheet describe the existing view. Project parameters can add further editable columns. Template locks are shown; do not force values through them.
- Apply changes / Discard / Refresh
- Apply writes staged cells with one Undo; a bad value can fail independently and remain visible for correction. Discard drops pending edits. Refresh reloads model values—resolve pending edits before refreshing or switching documents. Names/numbers can be swapped through the apply workflow.
View Placement
2 entries
This page manages existing viewports. It moves placement rather than creating a duplicate model view.
- View placement table · Sheet / Sheet Name / View / Detail Number / View Type
- Edit Sheet to another existing sheet number to move a viewport; edit Detail Number to renumber it. Sheet Name, View and View Type are read-only context. Moving recreates the viewport at the same position/type and retains its detail number when available. Check title/view overlap on the destination.
- Apply changes / Refresh / Open sheet in Revit
- Apply commits staged placement changes. Refresh reloads placements. Open sheet activates the selected sheet for layout inspection; it does not apply pending destination edits.
Renumber Views
4 entries
These are viewport detail numbers on sheets, not view names or sheet numbers.
- Refresh / Sheet filter / Sheet checkboxes / Open in Revit
- Refresh loads sheets/viewports. Filter narrows the sheet list; check sheets for multi-sheet application. Open activates the selected sheet so you can compare the diagram with actual placement.
- Ordering method / View buttons / Restart clicking order
- Choose a location-based ordering method or manual click order. In manual mode click view buttons in the desired order; Restart clears that recorded order. Inspect the proposed numbers before applying.
- Prefix / Start / Suffix
- Compose detail numbers from an incrementing start with optional prefix/suffix. They must be unique on each sheet. These fields do not renumber the sheets themselves.
- Apply to this sheet / Apply to checked sheets
- Apply this sheet renumbers its viewports. Apply checked uses the checked sheet batch. Review resulting detail numbers on every affected sheet, particularly when using manual order.
Layout defaults and diagnostics
4 entries
Paper measurements use mm in metric projects and inches in imperial projects, as displayed. Valid lengths are non-negative.
- Left / Right / Top / Bottom margins
- Reserve paper space inside the title-block outline on each side. Revit does not expose a universal usable drawing area; configure these for the actual border/info strips of your title block.
- Spacing / Title allowance / Overflow
- Spacing separates placed views. Title allowance reserves extra room for viewport titles. Overflow chooses another sheet or scale reduction as available. Annotation extents are estimated; review the real sheet layout.
- Save / Restore defaults
- Save validates and stores layout defaults. Restore defaults loads initial layout values but does not save them yet; click Save to retain the reset. Parameter naming defaults are saved from the configuration page.
- Log folder Open / Settings folder Open
- Opens the relevant local folders for diagnosis or configuration backup. Use the result report and logs when a row fails rather than assuming an entire batch failed.
Check the result
- Inspect one sheet’s template, scale, crop, annotation and viewport titles in Revit. Compare reports with actual created items and test a pending edit before bulk Apply.
Troubleshooting and limits
- Template locks, invalid names, missing types and existing sheet numbers can block rows. Fix highlighted errors and preview again. Layout estimates do not replace inspecting annotations and existing viewports on the sheet.
Running it again
Use managers for existing content; validate names and numbers before a second creation run. Nothing in the grids is written until Create or Apply changes.